
It's Getting Hot in Here!
/The bathroom tile install is underway and that means one thing! The radiant heat for the floors is about to begin! As I talked about before the best heat for your home is radiant heat by far. With this being a renovation I had to find a way that was easy enough to install and would give me the comfort of heated floors in a couple areas of the home. I have the master bath, girls bathroom, front entry, and mudroom. These would all be perfect areas to install radiant heat. The first company I thought of was nVent Nuheat to help me accomplish my goals. I have been installing Nuheat heated floor systems since 2008. The first development project I worked on in Jersey City had the Nuheat system in all of the master bathrooms. We were one of the first developers in the area to really add this to our projects and people were freaking out about it. There is nothing better then waking up on a cold morning and feeling warm tile beneath your feet as you start your day.
Now a lot of people might say it is just too expensive and there is no way I can afford that. YOU ARE WRONG! this system is very economical and runs off of minimal electric output. For my home I went with the Nuheat Cable and Membrane. This was the best fit for my project because of the following:
-Reduces risk of tile cracking because of subfloor moment
-Acts as tile underlayment
-Flexible wire spacing
-On-site flexibility for a space that is unique in size and shape
-Compatible with modified thinsets for tile setting
-Quick install
By installing the membrane I did not have to spend more money on concrete board and made the install of the tile seamless. It also gave me another layer of waterproofing in the bathroom which is very important. Since my home is older I wanted to make sure the tile was protected from movement and the possibility of tile and grout cracking. I knew the cable system with the membrane was going to be the best install for my project.
The install could not have been easier; all you have to do is apply the thinset to the floor and roll the membrane out. Press down firmly with a roller or trowel so it adheres. Next snap in the cable to the membrane. A 2-3-2 spacing is used in smaller areas and larger areas use 2-2 spacing for a larger watt output. Talk to your rep. on what is best for your home before the install starts. Then cover the membrane and cable with thinset making sure it is 100% encapsulated. Let it dry and then you are ready for tile.

Membrane and Cable System

Membrane is rolled out with thinset on the subfloor.

Getting ready to put down our cable.
A very important detail that cannot be overlooked is to always test the cable as soon as you open the box. Nuheat can provide a MatSense Pro which will make sure there are no breaks in the cable before you install it. It also will tell you if a break occurs while you are installing an alarm will go off. The MatSense Pro will stay connected until the tile is 100% installed and you are ready for the thermostat.
Before you put down your final thinset make sure you run the thermostat wire, which is black, onto the mat and then you are ready for thinest and you tile floor. If you forget to do this the thermostat will not give you the exact reading you want and you will have to keep it in ambient temperature mode for use.
Now that the mat and cable are down it is time to install the tile!

Girls bathroom floor complete.

Girls Bathroom

Girls Bathroom

Master Bathroom floor is complete.

Master Bathroom floor is done in a herringbone pattern.

Master Bathroom shower is complete.
Now with the bathrooms complete is was time to move onto the entry and mudroom area. As you remember the entry is part of the living room and the mudroom is right off the dining and kitchen area. All of these rooms really have become one since I took down the walls. I wanted to have one large area and have all of these rooms interconnected. With that being said I am sharing my heat with all of the rooms. Since I have put the Nuheat at the entrance and in the mudroom area it allows me to share the radiant heat with the living room and kitchen/dining area.

Membrane is down in the entry.

Cable is down in 2-3-2 pattern.

Finished tile is inlayed into the wood.
The membrane aloud me to match up the tile perfectly with the wood. This was a very different install as the tile is inlayed into the wood, not your conventional install. My height had to match up perfectly and the membrane was the perfect solution for me.

The last area is the install of the mudroom. Since this is a large area around 150 sq ft., the wire spacing started in the 2-2 pattern, which gives you 15 Watts per square foot as outlined by my rep. I also have 12’ ceilings in this area so having the extra heat is very important to properly heating this room. After the initial 2-2 spacing, we transition back to the 2-3-2 (12 Watts per square foot) for a gentler transition to the unheated area. This is also the area where the custom step that transitions into the dining room is going to be installed. It is going to feel great under our feet when walking through this room to the rest of the home.

Membrane is going down in the mudroom.
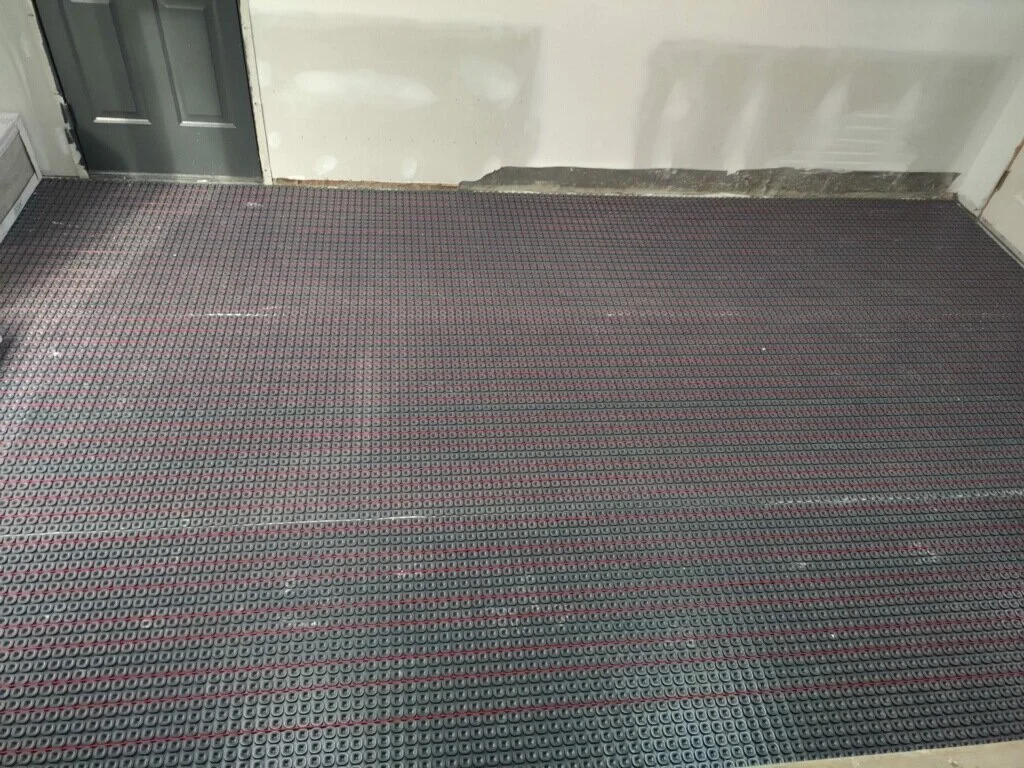
Cable starts with 2-2 spacing and then transitions into 2-3-2 as we get closet to the step.

Tile is down.

It is all grouted and complete.
The final step is installing the thermostat and turning on the heat! The Signature thermostat is North America’s first Wifi-enabled thermostat for floor heating. You can control the thermostat through IOS and Android smart phone app. Something I cannot wait to play around with is that it also works with Alexa, Google Home, and Nest. I will be able to call out to any of these smart home programs and they will turn the heat up, down, or off. This will allow me to control and save money on my energy consumption. With all of my smart home technology syncing together it allows the home to be very energy efficient. If I forget to turn the floors off I can do so while traveling so I am not wasting any energy.

Signture wifi enabled thermostat.